Wednesday 30 October 2013

Skinning

After taking a month off I've picked up the tools again and started by making some templates up to transfer onto the plywood.


Although the template is to size, I cut the plywood over size by 10mm along the chine and ensured I had a straight edge forward of frame#2, the ply was dry fitted numerous times with a little fairing needed here and there ensuring it was a neat fit.
 
 
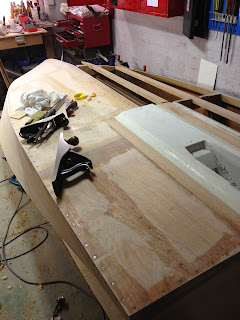
 All holes are pre-drilled and counter sunk, I also gave the inside of the panel a coat of Epoxy prior to fitting.
 Taking about 1hr20min to fit 1 side (by myself) and with the resin curing, I found it a lot easier on the other side if I pre-screwed the screws in the holes before applying the epoxy, this saved me a good 30min


 The bottom side has been cut down to 10mm over and I now have to cut out a section for the JSki hull and try and get a flat, even transition


Friday 18 October 2013

Bending and Fairing

With my wife working back late quite a bit over the last few weeks it has given me a considerable amount of time to working on my little project.

Sheers and Chines

After breaking a sheer while bending it in to place I soon learnt my little kettle steamer is no good for anything requiring more than 20-30min of steam so I found myself a piece of 80mm down pipe, plugged an end up, filled it with boiling water and soaked the 2 sheers for about 48hrs. They were then remove, clamped to the breast hook, bent into place and left to dry while we went away for 3 days.

Soaking Pipe
Upon my return they were un-clamped, epoxied and screwed into place.

I must admit I was quite surprised at how easy it was to bend the sheers, the chines on the other hand were a different story. Due to the large amount of twist I decided to put in the chine, it made them quite difficult to hold in place while the epoxy cured, so I thought I should add a chine blocking member to the stem to give me a bigger surface to adhere to, weather it helped or not I'll never know.

After I had started to fair the chines back I soon discovered that I had mounted them to far back (5mm), so I laminated an additional 8mm piece on and faired in back, it actually worked out really well.


Chine blocking member


Chines attached and faired

Joining

While I was in the process of fairing I thought I should start to look at how I will go about joining the plywood and which method I would use, butt or Scarf?

In the end decided on Scarfing the joint and made myself a few jigs that would help me achieve a nice strong and flat join.

Open pressing jig
  I found a scrap piece of 28mm Armor Ply and made up a press that would hopefully keep the joint as even as possible across the width, keep the board straight along the length and fill in any voids where I over sanded/planned. Of course it all had to be covered in wax paper and clear packing tape to prevent the resin from sticking, I then clamped it all together once the epoxy was applied.


Ply being pressed


Scarf Joint fresh from the jig


All that was needed was a quick sand and I have a perfectly flat even scarf join, I couldn't be happier with the result and that's another easy job completed which I thought would be a challenge